
How to Create the Perfect Wedding Stationery Suite: Design Tips & What to Include


Planning a wedding involves many moving parts, but one of the most overlooked — yet impactful — elements is your wedding stationery. Far beyond just being a means of delivering information, your invitations, save the dates, RSVP cards, and other wedding paper goods set the tone for the entire celebration. They reflect your personal style, give guests a taste of what’s to come, and help everything feel beautifully coordinated.
Whether you're designing your own or working with a designer, here’s everything you should consider when creating wedding stationery that’s thoughtful, practical, and visually cohesive.
Start With the Wedding Theme
Your stationery is often the first thing your guests will see, so it’s worth putting some thought into how it reflects your wedding theme. Ask yourself:
Is your wedding formal or relaxed?
Will it be a rustic countryside event, a chic city celebration, or a bohemian beach day?
Are you using specific colours or motifs?
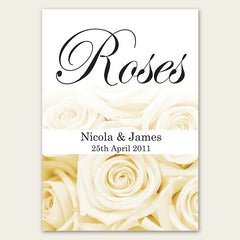
Aligning your stationery design with your theme helps build anticipation. For example, if your save the date features minimalist typography with clean lines, your formal invitation might expand on that with elegant foil accents or textured paper in your chosen colour palette.
Think About the Colour Scheme
Colour is one of the most powerful tools in wedding stationery design. A consistent palette across all items — from your save the dates to your menus and thank-you cards — ties everything together.
Start by choosing 2–4 core colours that suit the season, your venue, and your personal tastes. Consider softer tones like blush, sage, or ivory for a spring wedding, or deeper hues like navy, burgundy, or forest green for a winter celebration.
It’s also wise to ensure your text contrasts well with your background colours to keep everything legible and elegant.
Develop a Motif or Visual Element
Introducing a visual motif — like a flower, leaf, or illustrated monogram — can help reinforce the overall identity of your wedding. This motif might start small, such as an icon on your save the date card, and then appear in more detail on your invitations or order of service.
Motifs often carry emotional significance. Some couples use floral designs that reflect the bridal bouquet or artwork based on the location of their engagement. It’s a subtle but powerful way to tell your love story visually.
Plan the Full Stationery Suite
Wedding stationery isn’t just about the invitation. There’s an entire suite of printed materials that might be needed throughout your celebration:
Formal wedding invitations and RSVP cards
Before you start designing, decide which of these you’ll need. This helps ensure the design elements can be carried consistently across the entire suite.
Add Personal Touches
Adding personalisation makes your stationery memorable. This could be through a short poem, a line of calligraphy, or even a custom illustration. You might also choose to handwrite certain parts, such as guest names or envelope addresses, to make each piece feel unique.
If you’re particularly crafty, you might even incorporate DIY elements like wax seals, hand-tied ribbons, or pressed flowers. Just keep in mind how much time you’ll realistically have — if you're doing a lot yourself, leave ample time in your schedule.
Practical Considerations: Print & Paper
Choosing the right paper stock and printing method is just as important as the design itself. Here are a few things to think about:
Paper thickness: Thicker stocks feel more premium and are more durable.
Finish: Matte, glossy, textured, or recycled finishes each create a different feel.
Print methods: Options like digital, foil, letterpress or embossing all have distinct visual styles and price points.
It’s also worth asking your printer or designer for a sample pack, so you can see and feel the materials before committing.
Timing and Sending
You’ll need to factor in printing and postage timelines to ensure everything arrives on time. As a general rule:
Save the Dates: Send out 6–12 months in advance (closer to 12 if it’s a destination wedding).
Invitations: Send out 2–4 months before the wedding.
Thank-you cards: Aim to send these within 2–6 weeks after the event.
Don’t forget to factor in time for designing, proofing, printing, and mailing.
Accessibility and Clarity
Make sure all your stationery is easy to read and provides clear instructions for your guests. If your event includes different ceremony and reception venues, or you’re hosting separate day and evening invites, make that distinction obvious.
Double-check addresses, spellings, dates, and any guest-specific details. A second pair of eyes is always helpful before going to print.
A Lasting Impression
Thoughtfully designed stationery does more than inform guests — it sets the emotional tone of the day and often becomes a keepsake. Many guests will save their invitations in memory boxes or scrapbooks, and you’ll likely want to do the same.
Take the time to get it right, and your stationery will become one of those small-but-mighty details that make your wedding feel unforgettable.

Recommended Articles


UPDATED ON
November 06, 2025
